Jim Hallock of Earth Blocks, LLC sets the first block in position. Only 15,499 blocks left to go!

The crew. Jim Hallock and Rich Gillespie are on the right.
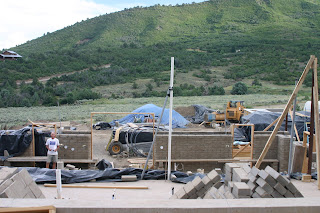
Blocks are staged and ready to start stacking. Window and door bucks are in the foreground ready to be set in place. Metal story poles are set and braced with 2x4s.
Jenny helps feed wire into the conduit. She is standing in what will be the kitchen pantry which will be home for the main breaker panel for all the heated space breakers. There is a main disconnect on the outside of the house, a main breaker panel in the garage, and a subpanel in the mechanical room.
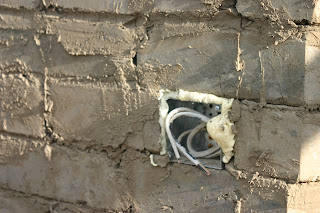
Electrical boxes are 4x4x2.5 inches. They are screwed to a 6 inch block of 2x4 and the block is screwed to the earth block. This box is attached to an interior wall which is made up of two 10" wide block walls so the gap between them is much less than the 7" in the exterior walls.
Since the electrical box is the same height as a block, there are no special cuts required to clear them. Once the wall passes the box, we foamed the cavity behind it.
Here the walls are at the 3' mark. Door bucks have been set in place.
The cleaning crew arrives. Jenny and Raider come over everyday at 5:00pm to help me sweep up brick debris, nails and other items that might damage the concrete floor.
We hit the 6' mark on Labor day weekend!
Jenny shows us a glimpse of the 400 bags of Perlite insulation. The gap between the walls is 7" and the Perlite fill at this width has an insulating value of R22.
A metal structure called Durawall is place across the walls at every fifth course to bridge the inner and outer walls. We had to make up our own custom configuration since it is not available to span a 24" wall. This solution Rich came up with is really strong. At the back of the walls is a piece of OSB that seals off the end of the wall by the door buck. We used metal framing channels to attach it to the blocks. We could have joined the walls at the window and door bucks by turning the blocks, but this would have create a thermal bridge between the inside and outside.
We used yogurt container lids to post notes for the brick layers and to remind myself of activity or features that would occur in the area. The excess mud will be scraped off the walls before the final finish is applied (traditional 3 coat stucco for the exterior and earth plaster for the interior). The small voids between the blocks are purposefully left to provide an anchor for the final finish which is forced into the gaps as it is applied.
Blocks
On August 8th Jim Hallock, Earth Block LLC, set the first block in place. This left 15,499 blocks to be set to complete the walls. A small crew returned on Saturday to lay the first course. These blocks were set in portland cement since they were in contact with the foundation and at slab height. Getting the first course level and straight is critical to making the rest of the wall look good. Eber had spent several days the week before setting story poles in the corners. These are used to attach string lines for getting blocks level, the rows level, and the walls vertical. The full crew arrived the first of the next week to begin setting blocks in earnest. The team was able to place two rows of inner and outer wall blocks per day. All but the first course of blocks are set in a mud slurry about the consistency of a chocolate milk shake. The block surfaces are wetted down before the slurry is applied.
On August 8th Jim Hallock, Earth Block LLC, set the first block in place. This left 15,499 blocks to be set to complete the walls. A small crew returned on Saturday to lay the first course. These blocks were set in portland cement since they were in contact with the foundation and at slab height. Getting the first course level and straight is critical to making the rest of the wall look good. Eber had spent several days the week before setting story poles in the corners. These are used to attach string lines for getting blocks level, the rows level, and the walls vertical. The full crew arrived the first of the next week to begin setting blocks in earnest. The team was able to place two rows of inner and outer wall blocks per day. All but the first course of blocks are set in a mud slurry about the consistency of a chocolate milk shake. The block surfaces are wetted down before the slurry is applied.
Window and door bucks
I created window and door bucks which were anchored in place. These will be screwed to the block walls as they rise and will be used for attaching the door jambs and window frames. The gap between the inner and outer walls at the door and window openings will be closed off with OSB attached to the blocks using metal framing studs. The gaps are then filled with spray foam. We could have bridged the opening with blocks but this would have created a thermal bridge for sucking heat from the interior.
I created window and door bucks which were anchored in place. These will be screwed to the block walls as they rise and will be used for attaching the door jambs and window frames. The gap between the inner and outer walls at the door and window openings will be closed off with OSB attached to the blocks using metal framing studs. The gaps are then filled with spray foam. We could have bridged the opening with blocks but this would have created a thermal bridge for sucking heat from the interior.
Electrical
While the crew set bricks I installed the wiring and electrical boxes. Jenny helped pull wire through the conduit under the slab. This was done by first sucking a pull string through the conduit with a shop vacuum. Once this was done, we taped the electrical wire to the string and one of us fed the cable into the conduit while the other pulled on the string. The electrical boxes are 4x4 inches which is the height of an earth block so there is no need to trim block heights to bridge the boxes with the next course. The boxes were set in the wall by first screwing them into a 6 inch piece of 2x4 and then attaching the 2x4 to the block using a couple 3 inch torques head screws. The blocks accept nails and screws but regular gold deck screws will snap of heads. The electrical boxes are firmly anchored and the 2x4 gives a good surface to affix the first wire staple. Once the next course of blocks were placed, the cavity behind the box was filled with insulating foam.
While the crew set bricks I installed the wiring and electrical boxes. Jenny helped pull wire through the conduit under the slab. This was done by first sucking a pull string through the conduit with a shop vacuum. Once this was done, we taped the electrical wire to the string and one of us fed the cable into the conduit while the other pulled on the string. The electrical boxes are 4x4 inches which is the height of an earth block so there is no need to trim block heights to bridge the boxes with the next course. The boxes were set in the wall by first screwing them into a 6 inch piece of 2x4 and then attaching the 2x4 to the block using a couple 3 inch torques head screws. The blocks accept nails and screws but regular gold deck screws will snap of heads. The electrical boxes are firmly anchored and the 2x4 gives a good surface to affix the first wire staple. Once the next course of blocks were placed, the cavity behind the box was filled with insulating foam.
Insulation
When the walls got high enough, we began filling the 7 inch space between the inner and outer wall with Perlite. Perlite is a pumice material that is popped similar to popcorn and is used as insulation and in the nursery business in potting soil. Perlite is nontoxic, low in embodied energy, and the source we got our material from is not too far from Durango. The perlite comes in 4 cubic foot bags and we will use about 400 bags of material to fill the walls. Perlite pours easily but is dusty and very light. It is best to put it in the walls when there is a slight breeze and to use a mask and glasses to keep from breathing the dust or getting it in your eyes. I did this activity over the weekend when the crew was not on site to spare them the dust.
When the walls got high enough, we began filling the 7 inch space between the inner and outer wall with Perlite. Perlite is a pumice material that is popped similar to popcorn and is used as insulation and in the nursery business in potting soil. Perlite is nontoxic, low in embodied energy, and the source we got our material from is not too far from Durango. The perlite comes in 4 cubic foot bags and we will use about 400 bags of material to fill the walls. Perlite pours easily but is dusty and very light. It is best to put it in the walls when there is a slight breeze and to use a mask and glasses to keep from breathing the dust or getting it in your eyes. I did this activity over the weekend when the crew was not on site to spare them the dust.
Progress
As of Labor Day weekend, the walls on the lower level are at, or in some places just shy of, 6 feet. It is starting to feel like a house.
As of Labor Day weekend, the walls on the lower level are at, or in some places just shy of, 6 feet. It is starting to feel like a house.


